Wednesday, September 24, 2008

Migrating to jQuery

About a week ago, my boss came to me and asked me to do add some new UI features to an existing interface.  Based on the request, I asked if I could use jQuery since I know the time it would take me to do the request with it versus without it.  I was allowed to do it as long as I provided some form of training on it.  Simple enough.  As I was updating the site, there was a few things in it that required me to have to fully update the entire site to jQuery and go away from its old ways.  Because of this, I thought it was be practical to provide a short post on some of the finding and conversions I had to do in order to go from standard, traditional JavaScript (i.e. document.getElementById()) to jQuery.


Why did I have to upgrade?

Before I get into the conversions, I think I should provide some details as to why I opted for an upgrade and not just add jQuery and do just what I was tasked to do.  The primary issue was that the existing JavaScript code had it's own $() function to take the place of document.getElementById().  Below is the $() function:

function $(x){
    return document.getElementById(x);
}

This, similar to that found in Prototype, caused some issues when I added jQuery to the mix.  Because of this, I could either update this function and all of the items that are calling it or do more work and remove the function and just convert everything to jQuery.  For consistency sake, I decided to do the latter.  It was a bit more work but it is better in the long run (and helped me confront all of the elements I needed to convert too).


Conversion Steps:

In order to go through with the conversion, the following steps were done:

  1. Adding the jQuery references to the appropriate pages.
  2. Comment Out/delete the existing $ function
  3. Replace all document.getElementById and existing $ calls.
  4. Replace all value calls
  5. Replace NULL object checks
  6. Replace attribute calls
  7. Replace CSS and Class Name calls


Step 1: Adding the jQuery References

This initial step was very simple in that it only required me to identify the pages that required the jQuery.js file to be added.  Since the web site that I was updating used ASP.Net Master pages, this made this step extremely easy.  After adding the simple <script> tag, I was ready to move onto the actual conversions.


Step 2: Commenting Out/Deleting the Existing $() Function

In order to ensure there is no conflicts, the existing $() function had to be renamed or removed.  In order to keep consistent, I deleted it.   By doing such, there would not be different ways to access document elements.


Step 3: Replace all document.getElementById() and $() calls

This step was very easy as well.  Since everything was already $("elementId"), a simple replacement was done.  I replaced $(" with $("#.  By doing such, it converted the old code to the new.  In order to ensure all calls were updated, I also replaced document.getElementById(" with $("# as well.


Step 4: Replace All Value Calls

Obtaining values in jQuery is a bit different than standard JavaScript.  Because of this, I had to do a couple things to complete this part of the conversion.  First, I did another simple replacement to convert .value to .val().  Afterwards, I went to each line that matches ".val() =".  At that point I manually updated the values to be parameters of the val() function.  It's not the best of ways but it worked for my small project.


Step 5: Replace NULL Object checks

This one is something I had to do a little bit of research into.  The jQuery function ($) always returns an object.  Because of this, we can not test any returned value to NULL.  The below example will return false every time.

if ($("#someElement") == null) {
    //code that will never get hit
}

In order to identify a NULL object, I had to check the object's value as shown below:

if ($("#unknownElement").val() == null) {
    //code that will get hit
}

The above example will return true if the object is NULL.


Step 6: Replace attribute calls

The code covered a number of select boxes and because of such, also addressed the selectedIndex property of such.  In addition, there was a couple of instances where I was looking at the text property of an option as well.  Traditionally, the code would look something like this:

var si = document.getElementById("selectBox1").selectedIndex;
var optionText = document.getElementById("selectBox1").options[si].text;

These values are not exactly as simple as obtaining a value for a drop down list in jQuery.  In order to obtain the selectedIndex property, I had to use the below code:

var si = $("#selectBox1").attr("selectedIndex");

After I had that, I had to do a similar thing for the options collection and the text:

var optionText = $("#selectBox1").attr("options")[si].text;

In this case, we are using the options attribute to obtain the collection, and then I was able to use call the text property as normal.


Step 7: CSS and ClassNames

The last item I had to tackle was addressing some CSS Class changes and typical style property changes.  In terms of CSS Classes, traditionally we would call an element's className attribute.  The issue with this methodology is that it does not work well with multiple classes on a single element.  It really give the user full responsibility of the classes.  While this isn't a bad thing, it can lead to a lot of possible bugs due to things being forgotten.  Thankfully, jQuery makes Class Names easy.

Any place that I had to add a Class Name, I updated the code to the following:

$("#someElement").addClass("className");

Any place that I had to remove a Class Name, I updated the code to the following:

$("#someElement").removeClass("className");

Lastly, any place that I checked to see if an element had a class, I did the following:

if ($("#someElement").hasClass("className")) { ... }


Conclusion:

While I covered what my conversion required of me, I know that there's a lot that I have not covered that many would have to do on a full conversion (i.e. radio buttons and check boxes).  There is a lot more that can be focused on in such conversions; however, I am hoping to provide a basic foundation for others to save some time in their conversions.  In addition to such a basis, I could see a small, simple application be created to do these conversions automatically through regular expressions as the means for replacement.  As more projects come up and/or I gain more time, I may do a more thorough guide or cheat sheet for such conversion or even one targeting converting from Prototype to jQuery or something like that.

kick it on DotNetKicks.com

Wednesday, September 10, 2008

Starting With jQuery - Dynamically Applying Rules

This series of posts on using jQuery with no prior knowledge comes to its fourth iteration.  So far, we've went over how to use jQuery for simple UI design, some of the UI effects that jQuery has to offer, and an introduction to the Validation Plug-in.  Today, we're going to build on the Validation plug-in by looking at how to add and remove rules dynamically.

If you would like to review the previous posts in this series, please feel free to review the links below:

In order to use the Validation plug-in, you'll need to add a few things to your web page:

To make matters easier as well, all example code used in this post can be downloaded from here: Starting With jQuery - Dynamically Applying Rules.zip


Why Is This Important?

As I was learning jQuery, I wanted to know how to streamline my client-side validation for my ASP.Net applications.  There were two challenges that I came across with traditional ASP.Net Web Form applications;  ASP.Net Web Pages can only have 1 HTML form with runat="server", and ASP.Net Button Server controls render as submit buttons.  Through these two challenges, it became obvious that I couldn't set my validation rules as was described in the previous post since the Validation Plug-in validates the form onSubmit.  With multiple ASP.Net Button server controls and only 1 form to contain all of these buttons, I had to dive deeper into the Validation plug-in to discover how I could add and remove rules dynamically so that buttons that wouldn't require validation would still function correctly.

In addition to the Validation Plug-in documentation, I scoured the Internet for examples of what I was doing.  While I found a very large amount of people using jQuery's Validation Plug-in with the Microsoft ASP.Net MVC Framework, I struggled to find a standard ASP.Net Web Forms example.  Hopefully, this post will help fill that gap.

Even though my initial problem domain revolved around traditional ASP.Net web forms, I'm keeping these examples in plain HTML for simplicity. In the future, I am planning on exploring applying jQuery with ASP.Net components such as Master Pages and User Controls, so stay tuned.


The Examples

This week's example has 2 web pages associated with 2 different JavaScript files.  The reason for the 2 sets of files is to see the challenges described above (as portrayed through Default1.htm and ValidationRules1.js) as well as provide a "fixed" version (as portrayed in Default2.htm and ValidationRules2.js).


The Form

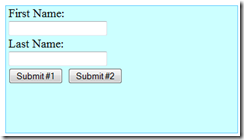
The HTML form used in the example is the same as the last post with 2 minor differences.  First, I've changed the colors after some colleagues made some comments about it (thanks guys!), and second, I added a second Submit button.  All in all the form is very simple.  The second example form adds additional elements as well and we'll cover them in a moment.

jQuery4-img1


Looking at the Old Way

By viewing Default1.htm in a web browser, clicking on the Submit #1 button will cause basic validation to occur, just like the previous post's example.  If you refresh the page and click on the Submit #2 button instead, we see the same behavior.

Opening up the Scripts/ValidationRules1.js file in your favorite text editor, you will see the same validation methodology used in the previous post. 

   1: //Our validation script will go here.
   2: $(document).ready(function(){
   3:  
   4:     //validation implementation will go here.
   5:     $("#TestForm").validate({
   6:         rules: {
   7:             txtFirstName: {
   8:                 required: true
   9:             },
  10:             txtLastName: {
  11:                 required: true,
  12:                 minlength: 2
  13:             }
  14:         },
  15:         messages: {
  16:             txtFirstName: {
  17:                 required: "* Required"
  18:             },
  19:             txtLastName: {
  20:                 required: "* Required",
  21:                 minlength: "* 2 Characters Required."
  22:             }
  23:         }
  24:     });
  25: })

This code attaches the validation rules to the specified form's controls and adds the validation method to the form's onSubmit event handler behind the scenes.  Since both Submit #1 and Submit #2 buttons are of type "submit", both buttons submit the form and trigger the validation code to fire.

If we wanted to change which fields are validated based on the button pressed, we need to modify the way we do things.


Apply and Removing Rules Dynamically

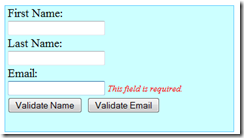
Open Default2.htm in a web browser to see that the form has changed slightly.  A new form field for the user to type in an email address has been added and the submit buttons have been relabeled.  Upon clicking on the "Validate Name" button, you'll see that First Name and Last Name are required fields.  By clicking on the "Validate Email" button, you see that the First Name and Last Name required labels disappear and a new label informing that Email is required appears.

jQuery4-img2

In order to accomplish these changes to the validation rules, new functions need to be written to dynamically add and remove the rules as necessary. 

   1: function validateEmailOnly(){
   2:     $("#txtEmail").rules("add", "required");
   3:     $("#txtFirstName").rules("remove", "required");
   4:     $("#txtLastName").rules("remove", "required minlength");
   5: }
   6:  
   7: function validateNameOnly(){
   8:     $("#txtFirstName").rules("add", "required");
   9:     $("#txtLastName").rules("add", {required:true, minlength:2});
  10:     $("#txtEmail").rules("remove", "required");
  11: }

The validateEmailOnly() function is called by the "Validate Email" button.  This function adds a required rule to the txtEmail form field and then removes the rules from txtFirstName and txtLastName fields.  The validateNameOnly() function works the same way but with the actions reversed.


Adding a Rule Dynamically

As you can see from the previous code block, adding a rule is fairly straight forward; however, there's 2 ways to do it.  The first way, as seen in the validateEmailOnly() function, applies only when you are adding a single, boolean (true/false) rule to a field.  In this scenario, we use the following syntax:

$("#txtEmail").rules("add", "required");

Dissecting this, we first get a jQuery object representation of the txtEmail form field.  Next, we call the rules() function, which in this instance accepts 2 parameters; an action and the name of the rule.  The action of "add" tells jQuery that we'll be adding this rule to the field for validation.  The rule parameter, in this case, accepts a boolean rule like required as a string value.

In the event that you want to add multiple rules to an element or just a single rule that is not boolean, like the minlength rule, then you can pass in an object as the rules parameter of the rules() function.  This way was demonstrated via the validateNameOnly() method through the following syntax:

$("#txtLastName").rules("add", {required:true, minlength:2});


Removing a Rule Dynamically

Now that we know how to add a rule dynamically, removing such is just as easy.  In order to remove a rule, we use the almost the same syntax as shown below:

$("#txtLastName").rules("remove", "required minlength");

There are only two things different when we remove instead of add rules.  The first is that the action changes to "remove" instead of "add".  The second difference is you specify the rules to remove in a space delimited string (as depicted above which removes both the "required" and the "minlength"  rules).

Prerequisites to Adding Rules

In order to apply rules to a field dynamically, the field has to be within a form that the jQuery Validation Plug-in will validate.  In the example code, this is handled already by building on the previous example.  Since we call the $("#TestForm").validate() function in document ready block of the script, all of the plumbing is handled for us.  If the validate() function isn't called on document ready, then the call will need to be made prior to applying your rules to ensure that the plug-in will act appropriately.


Limitations of Dynamically Adding Rules

With this flexibility, there is one limitation: there is no way to dynamically set a message.  There is no messages() function like there is a rules() function.  Because of this, a dynamically added rule will use its default message or the form field's title attribute value if present.  In order to overcome this issue is to call the form's validate() method (as described in the Prerequisites to Adding Rules section above) on document ready and setting the messages for all fields there.  Setting messages for rules does not apply those rules implicitly so you can set every field that will be validated in some way with every message if you wanted and still be fine.  This can be seen in the differences between the Email field's validation message and that of the Name fields.


Conclusion

That's it for this post.  I hope that you found it helpful in your jQuery Validation endeavors.  Next week we'll be diving into creating our own custom validation rules, and shortly there after I'm going to begin examining the challenges of using this great tool with traditional ASP.Net web forms.

Download This Weeks Code: Starting with jQuery - Dynamically Applying Rules.zip

kick it on DotNetKicks.com

Wednesday, September 3, 2008

Starting With jQuery - Validation Plug-in

This series of posts on using jQuery with no prior knowledge comes to its third iteration.  Today's post focuses on an introduction to the Validation Plug-in.  This plug-in extends jQuery by adding simple client-side validation to a given HTML form.  In future entries we'll examine some of the challenges this plug-in has with traditional ASP.Net web form applications; however, for this post, we'll focus on just the basics.

If you would like to review the previous posts in this series, please feel free to review the links below:

In order to use the Validation plug-in, you'll need to add a few things to your web page:

The jQuery Validation Plug-in that I'm using in this example was written by Jörn Zaefferer.  His web site houses all of the documentation I used to learn how to use the plug-in.  If, after reading this post, you want to explore more, I highly encourage anyone to go to his site.  It's a great resource.

The jQuery Validation Plug-in works by examining the DOM of an HTML form and then assigning rules to the various field elements.  Optional, custom messages can be assigned to these validation rules as well to enhance the user experience.

Before we dive into the plumbing of the Validation Plug-in, let's first draw up a simple HTML form.

  1: <!DOCTYPE html PUBLIC "-//W3C//DTD XHTML 1.0 Transitional//EN" "http://www.w3.org/TR/xhtml1/DTD/xhtml1-transitional.dtd">
  2: <html xmlns="http://www.w3.org/1999/xhtml">
  3:  
  4: <head>
  5:     <meta http-equiv="Content-Language" content="en-us" />
  6:     <meta http-equiv="Content-Type" content="text/html; charset=utf-8" />
  7:     
  8:     <title>jQuery Example 3</title>
  9:         
 10:     <script type="text/javascript" language="javascript" src="Scripts/jquery-1.2.6.js"></script>
 11:     <script type="text/javascript" language="javascript" src="Scripts/jquery.validate.js"></script>
 12:     <script type="text/javascript" language="javascript">
 13:         //Our validation script will go here.
 14:     </script>
 15:         
 16:     <style type="text/css">
 17:     #container {
 18:         width: 350px;
 19:         height: 8em;
 20:         border: 1px #009933 solid;
 21:         background-color:#66FF66;
 22:         display:block;
 23:     }
 24:     
 25:     label, input{
 26:         margin:2px 0px 1px 4px;
 27:     }
 28:     
 29:     label {
 30:         margin-top:3px;
 31:         font-family:"Times New Roman", Times, serif;
 32:         font-size:1.1em;
 33:         font-weight:bold;
 34:     }
 35:     </style>
 36: </head>
 37:  
 38: <body>
 39: <div id="container">
 40:     <form id="TestForm">
 41:         <label for="txtFirstName">First Name: </label><br />
 42:         <input name="txtFirstName" type="text" id="txtFirstName" title="Please Enter a First Name" /><br />
 43:         <label for="txtLastName">Last Name:</label><br />
 44:         <input name="txtLastName" type="text" id="txtLastName" title="Pleaes Enter a Last Name"/><br />
 45:         <input type="submit" value="Submit" id="btnSubmit"  />    
 46:     </form>
 47: </div>
 48: </body>
 49: </html>

Copying the HTML above to a file and viewing it in a browser should present you with a form similar to the following image:

TestForm

Our HTML form, TestForm, is very simple.  It contains simply 2 set of labels and text boxes for the user to input a user's First and Last Name.  The text boxes have their Title attribute set for accessibility reasons and to be used by our validations.

There are two ways we can add validation to the form.  We can add it by predefining the rules per form field, or add the rules in programmatically.  For today's topic, we'll look at predefining the rules in the form's jQuery representation.

Like previous posts that focused around rounded corners and center alignment, we'll need to setup the validation rules when the document element is ready.

  1: $(document).ready(function(){
  2:     //validation implementation will go here.
  3: })

Inside the function to be called when the document element is ready, we're going to need to select our TestForm through jQuery and call the validate() function.  The validate() function allows us to set the rules (and messages later on) for each of our form fields.  Let's look at the code for our form.

  1: $("#TestForm").validate({
  2:     rules: {
  3:         txtFirstName: {
  4:             required: true
  5:         },
  6:         txtLastName: {
  7:             required: true,
  8:             minlength: 2
  9:         }
 10:     }
 11: });

The validate() function takes an array of objects for an input parameter.  In the above snippet of code, we are passing in a rules object.  This rules object has an entry for each of our text box fields of our form.  For our example, we are requiring that both fields are required and the Last Name field requires 2 or more characters.

That's it.  We have successfully wired up simple validation to our form.

Putting the JavaScript together we have the following code:

  1: ...
  2: <script type="text/javascript" language="javascript">
  3: //Our validation script will go here.
  4: $(document).ready(function(){
  5:     //validation implementation will go here.
  6:     $("#TestForm").validate({
  7:         rules: {
  8:             txtFirstName: {
  9:                 required: true
 10:             },
 11:             txtLastName: {
 12:                 required: true,
 13:                 minlength: 2
 14:             }
 15:         }
 16:     });
 17: })
 18: </script>
 19: ...

After we add our script to our HTML and refresh our browser, we can submit the form to find that our fields now show off our required field validations. 

RequiredFields

Filling in the First Name and only a single character for the Last Name we also see our minimum length validation in action as well.

Length

Something that you may notice is the error text is the same for each of the rules.  In addition, the error text is the same as the text box Title attribute values.  In order to change this error text, we can add another object to the validate() method of our script.  Let's append the object array parameter by adding a messages object as shown below.

  1: $("#TestForm").validate({
  2:     rules: {
  3:         txtFirstName: {
  4:             required: true
  5:         },
  6:         txtLastName: {
  7:             required: true,
  8:             minlength: 2
  9:         }
 10:     },
 11:     messages: {
 12:         txtFirstName: {
 13:             required: "* Required"
 14:         },
 15:         txtLastName: {
 16:             required: "* Required",
 17:             minlength: "* 2 Characters Required."
 18:         }
 19:     }
 20: });

Just like the rules object from before, the messages object contains elements of the same name as our form fields.  These elements contain a mapping between the rules and the message to display once validated.  If a rule is presented without a message, the Title attribute will be used still.

Making these updates and saving our HTML file, we can refresh our browser window to view the changes.

Required and Length

In the even that the Title attribute is not present, canned messages relative to the rules will be displayed in a similar fashion as the messages object that we just added.

Below is the full HTML code:

  1: <!DOCTYPE html PUBLIC "-//W3C//DTD XHTML 1.0 Transitional//EN" "http://www.w3.org/TR/xhtml1/DTD/xhtml1-transitional.dtd">
  2: <html xmlns="http://www.w3.org/1999/xhtml">
  3:  
  4: <head>
  5:     <meta http-equiv="Content-Language" content="en-us" />
  6:     <meta http-equiv="Content-Type" content="text/html; charset=utf-8" />
  7:     
  8:     <title>jQuery Example 3</title>
  9:         
 10:     <script type="text/javascript" language="javascript" src="Scripts/jquery-1.2.6.js"></script>
 11:     <script type="text/javascript" language="javascript" src="Scripts/jquery.validate.js"></script>
 12:     <script type="text/javascript" language="javascript">
 13:         //Our validation script will go here.
 14:         $(document).ready(function(){
 15:             //validation implementation will go here.
 16:             $("#TestForm").validate({
 17:                 rules: {
 18:                     txtFirstName: {
 19:                         required: true
 20:                     },
 21:                     txtLastName: {
 22:                         required: true,
 23:                         minlength: 2
 24:                     }
 25:                 },
 26:                 messages: {
 27:                     txtFirstName: {
 28:                         required: "* Required"
 29:                     },
 30:                     txtLastName: {
 31:                         required: "* Required",
 32:                         minlength: "* 2 Characters Required."
 33:                     }
 34:                 }
 35:             
 36:             });
 37:         })
 38:     </script>
 39:         
 40:     <style type="text/css">
 41:     #container {
 42:         width: 350px;
 43:         height: 8em;
 44:         border: 1px #009933 solid;
 45:         background-color:#66FF66;
 46:         display:block;
 47:     }
 48:     
 49:     label, input{
 50:         margin:2px 0px 1px 4px;
 51:     }
 52:     
 53:     label {
 54:         margin-top:3px;
 55:         font-family:"Times New Roman", Times, serif;
 56:         font-size:1.1em;
 57:     }
 58:     </style>
 59: </head>
 60:  
 61: <body>
 62: <div id="container">
 63:     <form id="TestForm">
 64:         <label for="txtFirstName">First Name: </label><br />
 65:         <input name="txtFirstName" type="text" id="txtFirstName" title="Please Enter a First Name" /><br />
 66:         <label for="txtLastName">Last Name:</label><br />
 67:         <input name="txtLastName" type="text" id="txtLastName" title="Pleaes Enter a Last Name"/><br />
 68:         <input type="submit" value="Submit" id="btnSubmit"  />    
 69:     </form>
 70: </div>
 71: </body>
 72: </html>

That's it for this post.  Next week, I'll be back in my routine and will be exploring how to programmatically add and remove rules as well as to examine some of the other rules that are available out of the box.  Later, we'll dive into creating custom rules.

Download Code: Starting with jQuery - Validation Plug-In.zip

kick it on DotNetKicks.com