Wednesday, November 19, 2008

Book Review: The Productive Programmer by Neal Ford

I'm going to do something a bit different than my normal posts and review a book I just finished reading.  I read a number of books each month and this will provide me an outlet of to point people to on some of my recommendations.


I don't know how I discovered The Productive Programmer by Neal Ford (O'Reilly Press 2008); however, I know that it was a great purchase.  The book covers various practices on how to become a more productive programmer through tips, tricks, and tools.  The book is split into two parts.  The first part really focuses on mechanics; how things are done and how they can be done better.  This section of the book focuses on a number of great recommendations for tools to use to make yourself faster as well as recommendations on good practices that make you faster or more automated.  The second part of the book is about the practices of programming.  This section focuses on refactoring tips, code analysis, metrics, and general philosophies.


The books is great for anyone who is looking to do their job better or make it easier by finding ways to remove the repetitive ceremony that we all encounter.  While the book is very Java and Ruby focused, he does point out a few examples in C# and tools specific to the .Net community as well.  He also draws on the philosophy that to truly know a subject, one should focus beyond their current problem domain to see how others address it.  I found very few items in this book that I couldn't find a counterpart in the .Net world or be able to translate it very easily.


Pros:

  • Easy to read
  • Very good tips starting at page 1
  • A large amount of small side notes drive key points home
  • Lots of examples

Cons:

  • Would like a larger variety of examples in different languages


If you are interested in finding out more about the book, please refer to the following links:

O'Reilly

Amazon.com

ProductiveProgrammer.com

Google Books

Neal Ford's Website


kick it on DotNetKicks.com

Wednesday, November 12, 2008

Justifying the Use of Build Scripts

Have you read about all of the great benefits of automation and continuous integration?  Have you talked about tools like Nant and a build server to your colleagues, bosses, and your friends?  Have you pitched the idea and desire to see it implemented (in part or completely)  only to have it justified too costly of an initial investment?  If you have, then you're probably like many individuals out there that have tried to find the right resource or answer to implementing automation in some fashion even though the benefits are already justified to yourself.  In this post, I'm going to discuss some of the components of continuous integration and also discuss how to get data to justify the (manual) use of build scripts to "automate" a scenario initially.  The scenario is not ideal (since build servers would enhance automation to a whole new level);however, the tiny victories are sometimes the best ones to start with.


Some Traditional Pieces of Continuous Integration

While the grand vision of continuous integration sounds great, getting there isn't as simple as everyone lets on or would like.  While implementing a continuous integration strategy can sound simple compared to other implementations, the road to such is marked with multiple milestones.  In order to get from a completely manual process to a completely automated one, it's best to identify some of the various pieces that many consider under the continuous integration title.  Below is a small list of items that are traditionally part of continuous integration:

  • Build Scripts
    • Traditionally XML files that are used by a build utility like Ant, Nant, Rake, or MSBuild.
    • Have the ability to execute a sequence of (possibly dependent) tasks that goes beyond just building the code.
  • Build Server
    • A server used to read and execute the build scripts
    • Configured to integrate with a version control system
  • Unit Testing
    • Code based tests used for testing the application's code
    • Typically associated with frameworks like MSTest, NUnit, and xUnit
  • UI Testing
    • Similar to Unit Testing; however, scripted usability test of the UI.
    • Frameworks like Selenium provide the ability for this level of automation.
  • Documentation Generation
    • Tools used read comments from code and/or the version control system to generate and update documentation
    • SVN2Wiki (by Neal Ford), yDoc, Sandcastle, and others provide ways to address this item.
  • Automatic Deployment
    • This is ultimately the culmination of all of the items.  The ability to check in code, test it, document it, and deploy it all in an automated fashion.
    • Many times is considered the truly last stage due to hesitancy to automatically placing code into a production environment.


What to automate first?

Looking at the list above, it is fairly easy to see identify that the Build Scripts provide the amount automation and flexibility that can extend as the road to continuous integration evolves down the milestones.  Because of their flexibility, they hold the key in solving the pain points that will fuel your justification. 


A Scenario That Could Use Automation

Imagine that you are in an environment where the developer builds and configures the code for multiple environments, copies the code to a staging location on a file share, and then waits while other teams (i.e. QA) takes the code to deploy it to their location.  In many instances, a bug comes back from the QA team and the process repeats itself; a rebuild and deployment into the staging area for each environment. 

Let's look at just this process in more details to understand the cost of it.

  • The Developer may have to do separate builds for each environment
  • The Developer has to navigate out to the file share
  • The Developer has to backup or delete the files currently in the staging location
  • The Developer navigates to each separate build destination
  • The Developer has to copy the files out to the staging area from each build destination
  • The Developer sends notification to various parties that the code is ready.

Now, your environment may be a bit different than what is portrayed here (the number of different builds and how they are distributed, such as .Net's Publish feature or using an FTP instead, for example), these events usually happen in some fashion in many companies based on my discussions about this with other developers. 


Identifying the Cost Savings of Build Scripts

Looking at these 6 steps, how much time does it take you to do them individually?  How long does it take your computer to do each build, for you to navigate to each folder, and to copy/backup files over the network?  How much time do you spend being distracted between these steps?  How many times do you have to do this because of bugs from QA? These are the question that will allow you to begin quantitatively justifying automating just these 6 steps using build scripts. 

Depending on your project size and complexity, the above 6 steps can take anywhere from 5 minutes to 30minutes (and even longer in some instances).  Multiplying this amount of time by the number of times the process occurs over release or a few months will help paint a better picture on the amount of time just the build scripts can save. 

Now, while this identifies the cost in time we are hoping to automate, we also have to look into the time it takes to create the build script.  If you have never researched build scripts before, this may take some time through research as well as implementation.  Build utilities, like those listed above, offer a wide variety of predefined tasks that will make the above tasks fairly simple once you learn it.  The documentation in most cases is decent to help make this a simple transition; however, when testing the script itself until you are comfortable with it may take an hour or two.  The good news is that once you have a script for a build utility written, they are very easy to turn into templates (thanks to variables/properties being able to be set in the scripts) for reuse on other projects.

Now that we have identified the length of time the process takes and the amount of time it will take to create the script, we only have to identify how many deployments it will take until the savings is seen. 


Conclusion:

While continuous integration is the goal on the horizon, we looked at a scenario where we justified the first step in simple automation.  This post describes creating build scripts that would be executed manually by the developer (in our scenario) that would do everything in that script automatically in the background.  This isn't the ideal situation; however, it is a step closer to automating the process even more (through a build server).  The main thing to identify here is that just because a build server is not available or cannot be justified at this time, trying to move forward with the build scripts will save time now and in the future. 


kick it on DotNetKicks.com

Thursday, November 6, 2008

Starting with jQuery - Using jQuery with Web Forms

In this sixth and final entry on a series of post focused on using jQuery with no prior knowledge, I dive into applying jQuery into the traditional ASP.Net web form environment.  The example code covered in this entry focuses on applying the jQuery Validation plug-in against 2 sets of input in the same form.  To make the example more realistic, the form fields are contained inside of content page to ensure the code works with ASP.Net's client id renaming feature/annoyance.


If you would like to review the previous posts in this series, please feel free to review the links below:


Code Downloads for this Post:

ASP.Net Example project


An Overview of the Example:

The example project provides the following files:

  • Default.master 
    • The master page used in the example
    • Contains the jQuery-1.2.6.js reference
  • CustomerExample.aspx
    • The content page referenced in the example
    • Contains the jQuery.validate.js reference
    • Contains the example's JavaScript reference
  • jQueryExample.js
    • Holds the custom JavaScript code to manage the validations

Starting with jQuery - Solution Explorer
Figure 1: The example's Solution Explorer


When the CustomerExample.aspx file is viewed in a browser, we see that the form is divided into two field sets (see Figure 2 below).  The left field set is to simulate a customer information form which requires the First Name and Last Name fields filled.  Should the user opt to enter a phone number, the field will validate against the format specified.  The right field set is simple a text box for a user to insert their email address to subscribe to a fictitious newsletter.  In this case, the email address field is required and validated as an email address using the Validation plug-in's email validation.

 Starting with jQuery - Example Screenshot
Figure 2: The example form(s)


Looking at the Code Behind:

While searching on the web, I found a number of different ways of linking an ASP.Net control's client id to jQuery, the simplest and cleanest that I came across was suggested which is found in the page's Page_Load() method.  In this block, I am calling the ClientScript.RegisterHiddenField() method to create a hidden form field with the name of the server controls and containing the value of the server control's client id, prefixed with a pound (#) symbol.  While I chose this method for the example, I highly encourage everyone to do additional research into alternative methods (which are out there) to accomplish this task if you do not like the idea of adding this amount of additional code.


Diving into the JavaScript:

Opening up the CustomerExample.js file, we see some variable declarations first thing, followed by the code that will be executed when the document is in a ready state and the form button's client side code.  Inside the code the executes once the document is ready, our custom phone number validation rule is added to the form validator.  Afterwards, we wire the page's form to the validation mechanism. NOTE: ASP.Net Web form applications only allow 1 server-based form on the page.  Lastly, the variables declared at the top of the file are provided the string values of the hidden form fields created in the code behind, and the First Name field is given focus.  At the bottom of the file, two functions are provided that dynamically add and remove the validation rules from the appropriate fields using the variables that hold the hidden field values to pass in the appropriate control ids.


Conclusion:

When I started using jQuery a few months ago, I was very impressed with how easy it was to implement and learn as well as how small it was.  Since then I have been busy using a number of different UI plug ins for it as well as integrating it into ASP.Net and Classic ASP applications for my company.  As I explore jQuery more, I will be posting more about it as well.  I hope that this series has provided you with the basic understanding on how to get started with jQuery as well as locating and using some of the many plug-ins available.  In addition, I hope that this last post has provided information for you to begin integrating it into your ASP.Net applications.


kick it on DotNetKicks.com

Friday, October 31, 2008

nPlus1.org: A New Resource For Architects

Twitter is great. It allows a whole new level of networking that can lead to some great discoveries. For example, I followed a conversation over to Chris Woodford's Twitter page. For those who don't know Chris, he's part of the popular Deep Fried Bytes podcast series. On Chris's page, he talked about nPlus1.org being open and looking for content authors. I've never heard of nPlus1.org and so I followed it.

Taken from the site's about section:

nPlus1.org is a site dedicated to helping Architects, aspiring Architects and Lead Developers learn, connect and contribute. On this site you’ll have access to great first party content written by some of the most skilled and experienced Architects working today. You’ll also have access to, and be able to contribute to a nexus of content from around the Internet aimed at keeping Architects up to date on all the new developments in their fields of interest.

This sounds very promising. Looking over the current posts, the site looks like a great resource for posting a collection of architecture related practices through community submissions. While the site has limited information at the time of this posting, I foresee it taking off in the very near future.

For more information, check out any of the following:
http://nPlus1.org
nPlus1.org on Twitter

Other Links:
Deep Fried Bytes
Chris Woodruff's blog

kick it on DotNetKicks.com

Saturday, October 25, 2008

Becoming More Than Just A Developer

A colleague of mine approached me the other day; wondering how he might be able to get out of the trend that he's found himself in.  The issue he approached me with was the fact that he's a tenured developer for his company and is often approached by his peers and managers to field questions and to help out when times are tough.  He has no issues with such; however, he finds himself drawn to newer technology than what he's working with on a daily basis and also loves helping people with their development questions.  In essence, he wants to become more than just the developer he is currently.  He wanted to know what he can do to expand his knowledge with new technology and project the information to others.

Like my friend, I had similar feelings in my job and career a while ago and looked at my options on how to branch out and grow outside of the mold that I found myself in.  Both of us wanted more than to come in to work, do our job, and then go home and do anything and everything.  In order to address my friends question, I decided to post some of the things that I would recommend based on my experience on going from a mind set of "just a developer" to acting on a desire to reach out and do more than code for a single company.


Finding Your Passion

So, you want to branch out and spread your wings.  Where do you start?  In order to answer this question, I have to ask: What are you passionate about?  The biggest advice that I can give to anyone looking to go beyond their daily developer routine is to know where your passions lie.  If you love designing applications, perhaps your passions surround UI designing or software architecture.  If your passion is a particular technology like Windows Workflow Foundation, perhaps focusing on such a technology, and similar ones, is your passion.  The reason why finding your passion is important is because you'll find yourself more motivated to follow through with various actions about such a topic.  Find your passion to find your subject matter.


Research Your Passion

Now that you have your passion identified, do a little research on it.  What are other people saying about your subject?  What resources are out there for you and others to learn about the subject?  If there are forums or a community around your subject matter, spend some time in there to see what everyone is saying about the subject.  While you're researching and tinkering with examples and such, don't be afraid to ask questions.  Everyone that learns something has questions about it at some time, and asking questions can yield to some good contacts and other opportunities (more on this later).

Something else to consider while researching your passion is to also look into attending local development user group sessions.  While the topics in question may not always be associated with your true passion, it does allow you to meet people, meet the organizers, and to somewhat get a feel for what others are looking for in such sessions.  Something else to keep a pulse on is the various development podcasts that exist.  These are invaluable since they can give you not only ideas but also lead you to new resources to expand your vision.


Finding a Starting Audience

Now that you have your subject matter that you are passionate about, who can you talk to about it?  There are many options with this.  You can, and probably already do, talk to your peers at work about this passion.  You probably talk about it more than you realize (I've been told that I do).  By talking to your peers you begin to generate a small buzz amongst your colleagues about what you're up to.  They may not know exactly what you're talking about all of the time; however, they know that it's important to you.

In addition to basic conversations with peers, you may find yourself in a position where a question that you asked is being asked again by a new community member or another person on a forum.  If you have the answer to the question, pipe up and share your knowledge.  Doing such will help others as well as help to build your confidence if you're concerned about giving the wrong information.  This also helps in showing others, including those that helped you, that you are learning the technology and enjoy it enough to help others with it.


Stepping Out of Your Comfort Zone

While everyone's comfort zone is different, taking a chance and changing things up a bit can be very beneficial to your desire of going beyond your typical routine.  One of the easiest ways to expand how your information and passion can be shared is to talk to your peers to see if they are open to the idea of spending their lunch hour learning about your subject.  Advise them to bring their lunch to the meeting and while everyone's eating, discuss your subject matter by providing some examples of such.  I'm not advocating "Death by Powerpoint" here since it's a sure-fire way to cause people anxiety about coming to your next one; however, having some key points to discuss and to show off the subject can help drive others to truly be interested in the topic.  From my own experience, I would recommend writing very little code on the fly and trying to keep the actual presentation to about 30-45 minutes to allow people time to get there and eat and to relax a bit since it IS their lunch hour.  If you keep doing these sessions (and you're presentation skills WILL get better if you listen to the feedback of your peers), you my find yourself presenting and helping out with different topics or even moving into "on the clock" training sessions that include more than just your immediate peers at the office. 


Personal Sites and Blogs

To go a step further, look towards getting a domain name and having a personal web site and/or blog.  If you want to start out small, there are a number of free blogging solutions out there (i.e. Blogger, Live Spaces, etc) where you can write about your experiences as you are learning about your passion more.  Make sure to publicize your blog and make it easy for people to subscribe to you.  The more you publicize the more people that you could possibly be helping.


Taking the Next Steps

At this point, the best thing I can suggest is to keep doing what has already been suggested.  Keep presenting to your peers and company, keep researching, keep answering questions, and keep getting involved.  After you feel confident in your skills with your passion, look towards possibly doing a presentation to your local developer's user group.  Seek out different user groups and events in other cities.  If you don't have a local group, look into possibly starting one.  Get involved in Twitter and other social web sites to connect to those that you have been following - you never know when they be begin looking in your direction.  As for the forums, if you are on there enough and build a good reputation, perhaps you may find yourself moving into a moderator position for that forum.  Eventually, your passions will lead to others as well and you'll be returning to researching and everything becomes cyclical. 


Conclusion

Nothing's wrong with being a developer and doing the typical coding, day in and day out.  However, if you are like my friend and myself, you may find your passion for coding transcends the code and you want to look into sharing your knowledge more.  If you're one of these individuals, I hope that some of these suggestions help you accomplish your goals and assist in voicing your passion.


kick it on DotNetKicks.com

Wednesday, October 15, 2008

Starting With jQuery - How to Write Custom Validation Rules

This series of posts on using jQuery with no prior knowledge comes to its fifth iteration. Today, I'm going to look more in depth at the Validation Plug-in.  We'll be looking at what rules the Validation Plug-in comes with out of the box followed by an example of how to create your own rules.   In addition to the typical project that I typically supply, I am also including a list of custom Validations that I have used to hopefully make everyone's life a little easier.
If you would like to review the previous posts in this series, please feel free to review the links below:

Required Downloads to use the Examples:

In order to use the Validation plug-in, you'll need to add a few things to your web page:

Code Downloads for this Post:

Source Code Download: Starting With jQuery - Custom Validation Rules.zip
Just the Rules File: Starting With jQuery - Additional Validation Rules.zip

A Look at some of the Built-In Validation Rules:

A wiser man than I once said that you should strive to never be your own plumber in software development.  Ultimately, you shouldn't spend time writing something that has already been written for you by someone else, is accessible, and meets your needs.  To go along with this concept I think it would be best to briefly cover what rules are already built into this excellent plug in.
  • Required: The typical and probably most used validation out there.
  • Minlength & Maxlength: Staple Length validation rules
  • Rangelength: Similar to Min/Maxlength; allows for selected item counts as well.
  • Min & Max & Range: Same as the "length" rules above only for numeric values.
  • Email: A very robust email validation rule
  • Url: Ensures the input is a well formatted url.
  • Date: Verifies the input can be parsed into a date.
  • Number: Ensures that the input is numeric.
  • Digits: Ensures only 0-9 characters (no commas, decimal points, etc.)
  • Credit Cards: Another complex and common validation rule made easy.
  • Accept: A file extension validation rule.
  • EqualTo: Ensures that the values of 2 elements are the same.
This is just a high level list of what's built in.  For additional information on all of the built in rules and how to use them, head over to the plug-in's documentation pages at http://docs.jquery.com/Plugins/Validation#List_of_built-in_Validation_methods.

Creating a Custom Validation Rule:

Now that we know what's already available, there may come a situation where we find that the built in rules just don't cover everything we need.  When such an occurrence comes upon us, we have the ability to extend the Validation Plug-in.  Custom validation rules are, ultimately, methods that are called and return a boolean value; true if the test succeeds and false if the test fails.  After the methods are created, they can be wired up to the jQuery validation component and used like any other rule.
To create a function that will encapsulate our validation test, we need to use one of the following signatures:
function myTest(value, element){...}
//OR
function mytest(value, element, params){...}
These function signatures, are identical except for the last parameter.  The value parameter houses the value that will be tested.  The element represents the element that is being tested.  The params involves any data that is being passed into the test (i.e. a minimum length value).
Looking over the list of built in validation rules, I noticed that one that was missing was a "Text Only" rule to ensure that only alpha characters would appear in the field.  Using this as an example, our validation rule function would look something like this:
function myTextOnlyValidation(value, element){
    return /[a-zA-Z ]/.test(value);
}

After we have the function established, we can then attach it to the jQuery Validation plug-in.  To do this, we call the validator object's addMethod() function.  This addMethod() function takes 3 parameters; a label for the rule, the function that contains the test, and the default message to display when the test fails. 
$.validator.addMethod("textOnly", myTextOnlyValidation, "Please enter only alpha characters( a-z ).");
Now that the function has been added, we can use the rule, called "textOnly", just like any of the built in rules.

Putting it all Together:

Now that we've looked at the built in rules, created our own rule, and wired up our custom rule; all that's left is to put everything together.  In this example, we're going to keep things simple and use just a single text box, a label, and a submit button (see Figure 1 below).
jQuery5 - Default Form Image
Figure 1 - the default form
For the example, we'll be applying 2 validation rules to this textbox.  The first will be the same required rule that we applied when we were first introduced to the Validation Plug-in.  The second rule will be our custom textOnly rule.  In order to do such, we need to add the following JavaScript to our code:
   1: //Our validation script will go here.
   2: $(document).ready(function(){
   3:  
   4:     //custom validation rule - text only
   5:     $.validator.addMethod("textOnly", 
   6:                           function(value, element) {
   7:                               return !/[0-9]*/.test(value);
   8:                           }, 
   9:                           "Alpha Characters Only."
  10:     );
  11:     
  12:     //validation implementation will go here.
  13:     $("#TestForm").validate({
  14:         rules: {
  15:             txtTextOnly: {
  16:                 required: true,
  17:                 textOnly: true
  18:             }
  19:         },
  20:         messages: {
  21:             txtTextOnly: {
  22:                 required: "* Required"
  23:             }
  24:         }    
  25:     });
  26: })
Note that in the example, the validation function is anonymous inside of the addMethod() function.
After the JavaScript has been applied to the form, we can verify that it works, as shown in Figure 2.
jQuery5 - Text Only Message
Figure 2 - Validating the Custom Rule

Some Additional Custom Rules:

I used the TextOnly rule in the example because it's a rather simple one to illustrate; however, any number of rules can be applied in the same way.  In order to provide additional content and to hopefully give others a jumpstart on implementing the jQuery Validation Plug-in onto their site, I have also added some additional custom rules.  These additional rules, available with in the example site or as a separate download, provide the following functionality:
  • Phone Numbers (in ###-###-#### format)
  • US Postal Codes ( ##### or #####-#### format)
  • Canadian Postal Codes
In addition, I highly encourage anyone interested in writing their own rules to play around and see what you can come up with.  With the power of jQuery, it's possible to pass 2 elements into test functions as parameters to verify something like a mathematical flash card scenario.  In addition, if you are looking for a good Regular Expression repository, I'd highly recommend http://www.regexlib.com for some additional patterns.


UPDATE 25 September 2012:

Since this is one of my most popular posts (THANK YOU!) I decided to address some comments about the example I wrote 4 years ago not working today.  

In terms of the advances of jQuery and the jQuery validation plugin, the code sample will still work properly; however, you'll need to upgrade both of them to the most recent versions (as of this update jQuery 1.8.2 and jQuery Validation 1.9).  Once this is done, the code sample will function continue to function as designed.

There is 1 small bug in the code sample though.  The textOnly rule found in ValidationRules.js and AdditionalRules.js has a bug with the regular expression.  Instead of an asterisk (*) in the regular expression pattern, it should be a plus-sign (+) to signify 1 or more instead of 0 or more.  Correcting this little bug will allow you to use the example rules without an issue.

Wednesday, October 8, 2008

jQuery, AJAX, and Classic ASP

While there was a good size buzz about jQuery before Scott Guthrie announced that jQuery will be shipping with Visual Studio, I have seen even more buzz with people wanting to learn more about it.  I have seen a huge number of new posts on ways to integrate it with traditional ASP.Net WebForm projects and tips and tricks with various extensions.  I have also noticed that Dreamweaver CS4 also has it bundled with it as well.  I'm not an Adobe guy so I have no idea if it was part of CS3 or not; however, I still find the momentum of jQuery amazing right now.


Even though I love learning and reading about the latest and greatest that the web design/development blogs have to offer, there are times in which we don't have the luxury of rebuilding our older/legacy applications.  Because of this, and a project I recently had, I explored the prospect of using jQuery to implement/replace AJAX functionality in a classic ASP application.


Background

This past week at work, I was given an unusual project that involved a legacy application that we rarely touch.  You know, one of those applications that has been around for ages and it works so no one wants to touch it if they really don't have to.  This particular application in my organization was a classic ASP application that had a page which was added on a couple years back that had the beginnings of AJAX.  The project was simple, ensure the site would be IE7 and FF3 compatible, because the current JavaScript would only work in IE6.  Sounds simple right?


Well, in all honesty, the project was pretty simple since I just had to use the appropriate XMLHTTPRequest object; however, once I put in the examples that are scattered across the Internet, it still didn't work.  So I had a choice between rewriting the entire JavaScript, the entire page in ASP.Net (my boss suggested/approved of such actions if required), or look into using jQuery instead of a homebrew of the XHR object.  I chose the latter.


The AJAX logic was rather simple.  The XHR object would send a request to a different classic ASP page which interpreted the query string and send back either a string value or actual HTML code through Response.Write().  There was no true, well formatted XML and it really was just simple request/response in a stateless manner.  Since this was the first time I'd ever looked at AJAX (or AJAH as some people would call this I'm finding out), I figured that I'd post it to help others with a speedy enhancement to their classic ASP instead of doing a full rebuild (which is costly).


Code

Download: jQuery and Classic ASP.zip


Overview

The code for this post focuses on a standard HTML page that sends XHR requests to a classic ASP application.  The way the classic ASP page is used in this example is similar to many web services where it exposes a number of functionality without publishing the WSDL file.  Our XHR will be passing a query string to this page that involves an ACTION parameter and then other values for that particular action.  Based on the ACTION, the ASP page will return a string value through the Response.Write() function.  In one instance, the ASP function will produce a string that is an HTML Select element, as well to illustrate what I'm finding out is called AJAH (Asynchronous JavaScript and HTML).


The ASP Code

This page has no UI.  On load, the page examines the query string for the ACTION parameter and based on the value, it will called the "Hello" function or the "GetList" function.


The HTML Form

The basic HTML Form is simple and divided into 2 parts.  The first is your typical "Hello, World!" example where the user enters their name and the jQuery makes a request to the classic ASP page for a returning string.  The second is a simple series of cascading drop down lists that are dynamically created on by the classic ASP page and sent back.  In both examples, I use jQuery's append() function to output the response to the screen.

The jQuery AJAX call is identical in both examples with the exception to the information being passed to the ASP page and the element the response is appended to.

   1: $.ajax({
   2:     type:"POST",
   3:     url: "http://localhost/jQueryExample.asp",
   4:     dataType: "application/x-www-form-urlencoded",
   5:     data: "Action=hello&Val=" + $("#txtName").val(),
   6:     async: false,
   7:     success: function(msg){ $("#fldHello").append(msg);}
   8: })


Conclusion

While I have to admit I hope I don't dive too much into classic ASP in the future, I do know that this experience has made my outlook on using it a bit better from a usability stance.  jQuery has made making AJAX style calls on classic ASP very simple to implement and allows for developers to not have to write their own plumbing code.

kick it on DotNetKicks.com

Wednesday, September 24, 2008

Migrating to jQuery

About a week ago, my boss came to me and asked me to do add some new UI features to an existing interface.  Based on the request, I asked if I could use jQuery since I know the time it would take me to do the request with it versus without it.  I was allowed to do it as long as I provided some form of training on it.  Simple enough.  As I was updating the site, there was a few things in it that required me to have to fully update the entire site to jQuery and go away from its old ways.  Because of this, I thought it was be practical to provide a short post on some of the finding and conversions I had to do in order to go from standard, traditional JavaScript (i.e. document.getElementById()) to jQuery.


Why did I have to upgrade?

Before I get into the conversions, I think I should provide some details as to why I opted for an upgrade and not just add jQuery and do just what I was tasked to do.  The primary issue was that the existing JavaScript code had it's own $() function to take the place of document.getElementById().  Below is the $() function:

function $(x){
    return document.getElementById(x);
}

This, similar to that found in Prototype, caused some issues when I added jQuery to the mix.  Because of this, I could either update this function and all of the items that are calling it or do more work and remove the function and just convert everything to jQuery.  For consistency sake, I decided to do the latter.  It was a bit more work but it is better in the long run (and helped me confront all of the elements I needed to convert too).


Conversion Steps:

In order to go through with the conversion, the following steps were done:

  1. Adding the jQuery references to the appropriate pages.
  2. Comment Out/delete the existing $ function
  3. Replace all document.getElementById and existing $ calls.
  4. Replace all value calls
  5. Replace NULL object checks
  6. Replace attribute calls
  7. Replace CSS and Class Name calls


Step 1: Adding the jQuery References

This initial step was very simple in that it only required me to identify the pages that required the jQuery.js file to be added.  Since the web site that I was updating used ASP.Net Master pages, this made this step extremely easy.  After adding the simple <script> tag, I was ready to move onto the actual conversions.


Step 2: Commenting Out/Deleting the Existing $() Function

In order to ensure there is no conflicts, the existing $() function had to be renamed or removed.  In order to keep consistent, I deleted it.   By doing such, there would not be different ways to access document elements.


Step 3: Replace all document.getElementById() and $() calls

This step was very easy as well.  Since everything was already $("elementId"), a simple replacement was done.  I replaced $(" with $("#.  By doing such, it converted the old code to the new.  In order to ensure all calls were updated, I also replaced document.getElementById(" with $("# as well.


Step 4: Replace All Value Calls

Obtaining values in jQuery is a bit different than standard JavaScript.  Because of this, I had to do a couple things to complete this part of the conversion.  First, I did another simple replacement to convert .value to .val().  Afterwards, I went to each line that matches ".val() =".  At that point I manually updated the values to be parameters of the val() function.  It's not the best of ways but it worked for my small project.


Step 5: Replace NULL Object checks

This one is something I had to do a little bit of research into.  The jQuery function ($) always returns an object.  Because of this, we can not test any returned value to NULL.  The below example will return false every time.

if ($("#someElement") == null) {
    //code that will never get hit
}

In order to identify a NULL object, I had to check the object's value as shown below:

if ($("#unknownElement").val() == null) {
    //code that will get hit
}

The above example will return true if the object is NULL.


Step 6: Replace attribute calls

The code covered a number of select boxes and because of such, also addressed the selectedIndex property of such.  In addition, there was a couple of instances where I was looking at the text property of an option as well.  Traditionally, the code would look something like this:

var si = document.getElementById("selectBox1").selectedIndex;
var optionText = document.getElementById("selectBox1").options[si].text;

These values are not exactly as simple as obtaining a value for a drop down list in jQuery.  In order to obtain the selectedIndex property, I had to use the below code:

var si = $("#selectBox1").attr("selectedIndex");

After I had that, I had to do a similar thing for the options collection and the text:

var optionText = $("#selectBox1").attr("options")[si].text;

In this case, we are using the options attribute to obtain the collection, and then I was able to use call the text property as normal.


Step 7: CSS and ClassNames

The last item I had to tackle was addressing some CSS Class changes and typical style property changes.  In terms of CSS Classes, traditionally we would call an element's className attribute.  The issue with this methodology is that it does not work well with multiple classes on a single element.  It really give the user full responsibility of the classes.  While this isn't a bad thing, it can lead to a lot of possible bugs due to things being forgotten.  Thankfully, jQuery makes Class Names easy.

Any place that I had to add a Class Name, I updated the code to the following:

$("#someElement").addClass("className");

Any place that I had to remove a Class Name, I updated the code to the following:

$("#someElement").removeClass("className");

Lastly, any place that I checked to see if an element had a class, I did the following:

if ($("#someElement").hasClass("className")) { ... }


Conclusion:

While I covered what my conversion required of me, I know that there's a lot that I have not covered that many would have to do on a full conversion (i.e. radio buttons and check boxes).  There is a lot more that can be focused on in such conversions; however, I am hoping to provide a basic foundation for others to save some time in their conversions.  In addition to such a basis, I could see a small, simple application be created to do these conversions automatically through regular expressions as the means for replacement.  As more projects come up and/or I gain more time, I may do a more thorough guide or cheat sheet for such conversion or even one targeting converting from Prototype to jQuery or something like that.


kick it on DotNetKicks.com

Wednesday, September 10, 2008

Starting With jQuery - Dynamically Applying Rules

This series of posts on using jQuery with no prior knowledge comes to its fourth iteration.  So far, we've went over how to use jQuery for simple UI design, some of the UI effects that jQuery has to offer, and an introduction to the Validation Plug-in.  Today, we're going to build on the Validation plug-in by looking at how to add and remove rules dynamically.

If you would like to review the previous posts in this series, please feel free to review the links below:

In order to use the Validation plug-in, you'll need to add a few things to your web page:

To make matters easier as well, all example code used in this post can be downloaded from here: Starting With jQuery - Dynamically Applying Rules.zip


Why Is This Important?

As I was learning jQuery, I wanted to know how to streamline my client-side validation for my ASP.Net applications.  There were two challenges that I came across with traditional ASP.Net Web Form applications;  ASP.Net Web Pages can only have 1 HTML form with runat="server", and ASP.Net Button Server controls render as submit buttons.  Through these two challenges, it became obvious that I couldn't set my validation rules as was described in the previous post since the Validation Plug-in validates the form onSubmit.  With multiple ASP.Net Button server controls and only 1 form to contain all of these buttons, I had to dive deeper into the Validation plug-in to discover how I could add and remove rules dynamically so that buttons that wouldn't require validation would still function correctly.

In addition to the Validation Plug-in documentation, I scoured the Internet for examples of what I was doing.  While I found a very large amount of people using jQuery's Validation Plug-in with the Microsoft ASP.Net MVC Framework, I struggled to find a standard ASP.Net Web Forms example.  Hopefully, this post will help fill that gap.

Even though my initial problem domain revolved around traditional ASP.Net web forms, I'm keeping these examples in plain HTML for simplicity. In the future, I am planning on exploring applying jQuery with ASP.Net components such as Master Pages and User Controls, so stay tuned.


The Examples

This week's example has 2 web pages associated with 2 different JavaScript files.  The reason for the 2 sets of files is to see the challenges described above (as portrayed through Default1.htm and ValidationRules1.js) as well as provide a "fixed" version (as portrayed in Default2.htm and ValidationRules2.js).


The Form

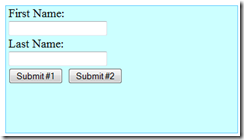
The HTML form used in the example is the same as the last post with 2 minor differences.  First, I've changed the colors after some colleagues made some comments about it (thanks guys!), and second, I added a second Submit button.  All in all the form is very simple.  The second example form adds additional elements as well and we'll cover them in a moment.

jQuery4-img1


Looking at the Old Way

By viewing Default1.htm in a web browser, clicking on the Submit #1 button will cause basic validation to occur, just like the previous post's example.  If you refresh the page and click on the Submit #2 button instead, we see the same behavior.

Opening up the Scripts/ValidationRules1.js file in your favorite text editor, you will see the same validation methodology used in the previous post. 

   1: //Our validation script will go here.
   2: $(document).ready(function(){
   3:  
   4:     //validation implementation will go here.
   5:     $("#TestForm").validate({
   6:         rules: {
   7:             txtFirstName: {
   8:                 required: true
   9:             },
  10:             txtLastName: {
  11:                 required: true,
  12:                 minlength: 2
  13:             }
  14:         },
  15:         messages: {
  16:             txtFirstName: {
  17:                 required: "* Required"
  18:             },
  19:             txtLastName: {
  20:                 required: "* Required",
  21:                 minlength: "* 2 Characters Required."
  22:             }
  23:         }
  24:     });
  25: })

This code attaches the validation rules to the specified form's controls and adds the validation method to the form's onSubmit event handler behind the scenes.  Since both Submit #1 and Submit #2 buttons are of type "submit", both buttons submit the form and trigger the validation code to fire.

If we wanted to change which fields are validated based on the button pressed, we need to modify the way we do things.


Apply and Removing Rules Dynamically

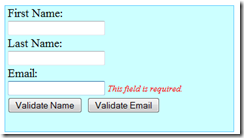
Open Default2.htm in a web browser to see that the form has changed slightly.  A new form field for the user to type in an email address has been added and the submit buttons have been relabeled.  Upon clicking on the "Validate Name" button, you'll see that First Name and Last Name are required fields.  By clicking on the "Validate Email" button, you see that the First Name and Last Name required labels disappear and a new label informing that Email is required appears.

jQuery4-img2

In order to accomplish these changes to the validation rules, new functions need to be written to dynamically add and remove the rules as necessary. 

   1: function validateEmailOnly(){
   2:     $("#txtEmail").rules("add", "required");
   3:     $("#txtFirstName").rules("remove", "required");
   4:     $("#txtLastName").rules("remove", "required minlength");
   5: }
   6:  
   7: function validateNameOnly(){
   8:     $("#txtFirstName").rules("add", "required");
   9:     $("#txtLastName").rules("add", {required:true, minlength:2});
  10:     $("#txtEmail").rules("remove", "required");
  11: }

The validateEmailOnly() function is called by the "Validate Email" button.  This function adds a required rule to the txtEmail form field and then removes the rules from txtFirstName and txtLastName fields.  The validateNameOnly() function works the same way but with the actions reversed.


Adding a Rule Dynamically

As you can see from the previous code block, adding a rule is fairly straight forward; however, there's 2 ways to do it.  The first way, as seen in the validateEmailOnly() function, applies only when you are adding a single, boolean (true/false) rule to a field.  In this scenario, we use the following syntax:

$("#txtEmail").rules("add", "required");

Dissecting this, we first get a jQuery object representation of the txtEmail form field.  Next, we call the rules() function, which in this instance accepts 2 parameters; an action and the name of the rule.  The action of "add" tells jQuery that we'll be adding this rule to the field for validation.  The rule parameter, in this case, accepts a boolean rule like required as a string value.

In the event that you want to add multiple rules to an element or just a single rule that is not boolean, like the minlength rule, then you can pass in an object as the rules parameter of the rules() function.  This way was demonstrated via the validateNameOnly() method through the following syntax:

$("#txtLastName").rules("add", {required:true, minlength:2});


Removing a Rule Dynamically

Now that we know how to add a rule dynamically, removing such is just as easy.  In order to remove a rule, we use the almost the same syntax as shown below:

$("#txtLastName").rules("remove", "required minlength");

There are only two things different when we remove instead of add rules.  The first is that the action changes to "remove" instead of "add".  The second difference is you specify the rules to remove in a space delimited string (as depicted above which removes both the "required" and the "minlength"  rules).

Prerequisites to Adding Rules

In order to apply rules to a field dynamically, the field has to be within a form that the jQuery Validation Plug-in will validate.  In the example code, this is handled already by building on the previous example.  Since we call the $("#TestForm").validate() function in document ready block of the script, all of the plumbing is handled for us.  If the validate() function isn't called on document ready, then the call will need to be made prior to applying your rules to ensure that the plug-in will act appropriately.


Limitations of Dynamically Adding Rules

With this flexibility, there is one limitation: there is no way to dynamically set a message.  There is no messages() function like there is a rules() function.  Because of this, a dynamically added rule will use its default message or the form field's title attribute value if present.  In order to overcome this issue is to call the form's validate() method (as described in the Prerequisites to Adding Rules section above) on document ready and setting the messages for all fields there.  Setting messages for rules does not apply those rules implicitly so you can set every field that will be validated in some way with every message if you wanted and still be fine.  This can be seen in the differences between the Email field's validation message and that of the Name fields.


Conclusion

That's it for this post.  I hope that you found it helpful in your jQuery Validation endeavors.  Next week we'll be diving into creating our own custom validation rules, and shortly there after I'm going to begin examining the challenges of using this great tool with traditional ASP.Net web forms.

Download This Weeks Code: Starting with jQuery - Dynamically Applying Rules.zip

kick it on DotNetKicks.com